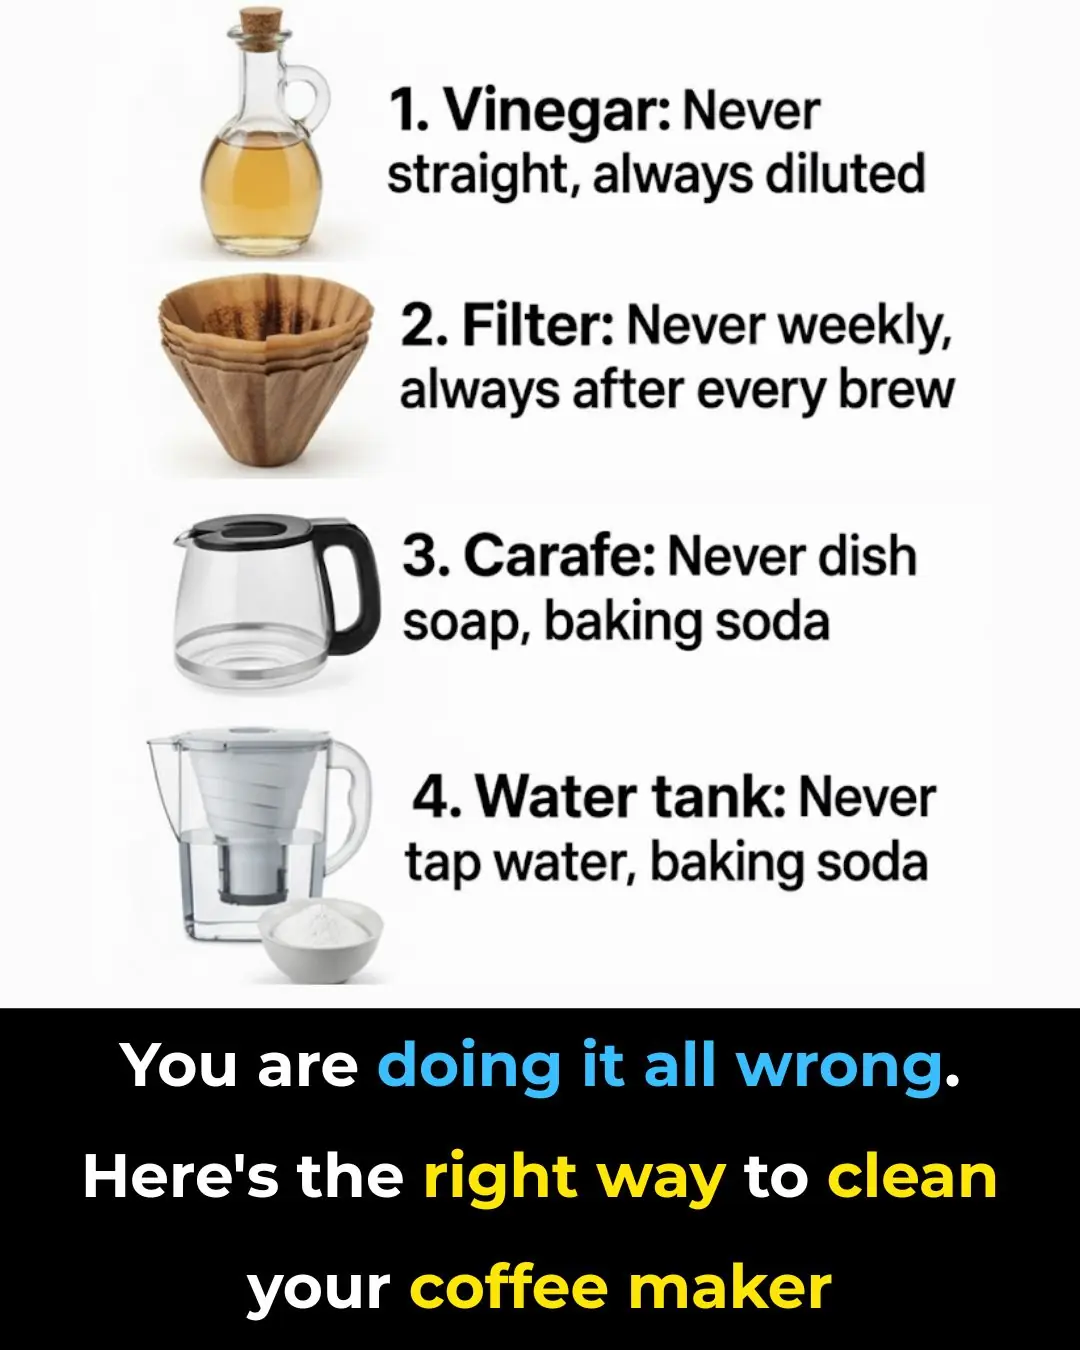
You are doing it all wrong. Here’s the right way to clean your coffee maker
Tips 29/10/2025 14:12
Defrosting your freezer may seem like a simple chore, but many people unknowingly make mistakes that reduce efficiency, raise energy bills, and even risk damaging their appliance. Frost and ice accumulation can significantly impair your freezer’s performance, forcing it to work harder and consume more electricity. Additionally, ice takes up valuable storage space that could otherwise be used for your food, making meal planning and storage more cumbersome.
While the urge to rush the defrosting process or use tools promising quick results is understandable, shortcuts can cause more harm than good. This guide will walk you step by step through the safest and most effective way to defrost your freezer. From understanding why proper defrosting matters to cleaning, drying, and reorganizing afterward, this guide covers everything you need for a smooth process.
Proper defrosting is essential because it directly impacts your freezer’s efficiency and lifespan. Ice acts as an insulator, preventing your freezer from maintaining a consistent low temperature. This forces the compressor to work overtime, which not only increases energy consumption but also wears out the appliance faster. Studies show that even a quarter-inch layer of ice can raise energy consumption by 10–15%.
Excess ice also reduces storage space, meaning less room for groceries and more frequent trips to the store. Regular defrosting keeps your freezer functioning optimally, maintains energy efficiency, and prolongs its life. In addition, a well-maintained freezer helps reduce the risk of food spoilage by ensuring that your items remain at the proper temperature.
Before starting, plan the defrost. Choose a day when your freezer is relatively empty to minimize the need for temporary storage for frozen foods. Early in the morning or before a grocery run can be ideal, as it allows you time to complete the process without rushing.
Gather supplies such as towels, bowls, and cleaning solutions. Prepare a storage plan for perishable items. If you lack a secondary freezer, use a cooler with ice packs to keep food cold temporarily. Planning ensures that the process is smooth and prevents food from thawing unnecessarily.
Remove all items from your freezer. Work quickly to prevent food from reaching unsafe temperatures. Use a food thermometer to ensure items remain below 40°F while outside the freezer.
Take this opportunity to discard expired or freezer-burned items. Doing so reduces waste and makes reorganizing easier when restocking. Additionally, separating items by type—meats, vegetables, prepared meals—can streamline the restocking process.
While it may seem tempting to speed up defrosting with a hair dryer, this can be dangerous. High heat can damage the freezer interior and increase the risk of electric shock.
A safer alternative is using bowls of hot water. Fill several bowls with hot (not boiling) water and place them on the freezer shelves. Close the door and let the steam loosen the ice. Replace water as it cools. This method is gentle on your freezer while still being effective, avoiding potential appliance damage.
Never use sharp objects like knives or metal tools to remove ice, as this can puncture walls and damage refrigerant lines, resulting in costly repairs.
Use a plastic spatula or a soft-bristled brush instead. These tools allow you to safely scrape away loosened ice without harming the freezer. Gentle techniques prevent scratches and maintain the appliance’s integrity.
Rushing is one of the most common mistakes during defrosting. Allow ice to melt naturally to prevent damage. Monitor the process and periodically remove melted water to avoid spills or flooding. Slow and steady defrosting ensures that your freezer remains in top condition.
Once ice is removed, it’s time to clean. Avoid harsh chemicals like bleach. Instead, use a natural solution of equal parts water and white vinegar. Vinegar disinfects, deodorizes, and is safe for food storage areas.
Wipe down all surfaces thoroughly, paying close attention to corners and seams where food residue often accumulates. This step helps maintain hygiene, eliminate lingering odors, and prepare your freezer for fresh, safe storage.
Before restarting your freezer, ensure all surfaces are dry. Use towels to remove moisture and leave the door open briefly to air out the interior. Residual moisture can freeze immediately once the appliance is turned back on, defeating your defrosting efforts. Thorough drying is key to preventing quick ice buildup and ensuring long-lasting results.
Restock thoughtfully. Place frequently used items in front for easy access and organize by type or category. Consider using bins or baskets to keep small items from getting lost at the back.
Labeling shelves and containers can further streamline organization, making it easier to find items and reducing the risk of food waste. Thoughtful organization after each defrost ensures maximum storage efficiency and convenience.
Defrosting frequency depends on ice buildup. Aim to defrost at least once or twice a year, but act sooner if ice exceeds 1/4 inch. Regular defrosting not only improves efficiency but also provides a chance to clean, reorganize, and check for expired items, extending the appliance’s life.
Avoid sharp tools, excessive heat, and rushing the process, as these can damage the freezer. Don’t neglect proper drying or food storage planning, as both can lead to ice buildup or spoiled items. Following these steps ensures safe, effective, and efficient defrosting.
By following this comprehensive guide, your freezer will not only perform better and use less energy, but it will also stay clean, organized, and ready to store your food safely for years to come. Regular, patient care is key to keeping your freezer in optimal condition.