Shrimp injected with impurities is easy to distinguish: Smart people will see this point
Tips 01/11/2025 16:22
If you own an air fryer, you’ve probably struggled with cleaning it at least once. Don’t worry — below are a few clever ways to clean your air fryer effortlessly, without harsh scrubbing or damaging its non-stick surface.
The air fryer has become an essential helper in modern kitchens — it makes crispy, delicious food with little to no oil. However, frequent use can lead to grease build-up, burnt residue, and unpleasant odors. If not cleaned correctly, the non-stick coating can peel off, shortening your appliance’s lifespan and even affecting food quality.
Follow these simple methods to keep your air fryer looking and working like new!
This is the part that gets dirtiest and requires the most care. Improper cleaning can strip the non-stick coating or leave behind grease and burnt food.
Here’s the safe and effective way to do it:
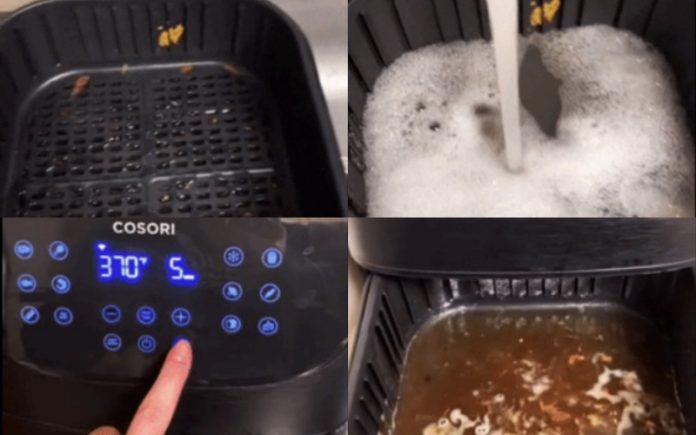
Step 1. After cooking, remove the food and allow the air fryer to cool down completely. Never pour water in while it’s still hot — this could warp the pot or damage the coating.
Step 2. Fill the inner basket with water until about one-third full. Add a few drops of mild dishwashing liquid and gently swirl it until foamy.
Step 3. Plug in the air fryer and set it to 180°C (around 350°F) for 5 minutes. The heat will loosen any sticky grease or burnt-on food.
👉 Remember to dry your hands completely before plugging in the appliance.
Afterward, unplug the air fryer, pour out the water, and wipe the interior with a soft microfiber cloth. You’ll see that most of the grime lifts off easily — no scrubbing needed!
Even though the outer shell doesn’t come in contact with food, regular cleaning helps keep it looking new and prevents dust or grease build-up.
Step 1. Always unplug the air fryer first to ensure safety.
Step 2. Dampen a soft cloth or sponge with mild detergent (like diluted dish soap or kitchen cleaner) and gently wipe down the exterior.
⚠️ Avoid:
– Glass cleaners or harsh chemicals
– Steel wool or abrasive pads
– Sharp tools that can scratch the surface
Step 3. Don’t forget to clean the air vents and small crevices — these often trap oil residue. Use a soft toothbrush or cotton swab dipped in warm water and mild soap.
Step 4. Wipe again with a clean damp cloth to remove soap residue, then let it air dry completely before using again.
If your air fryer tray or basket is heavily coated with grease, try this deep-clean method.
You’ll need:
A soft-bristle brush
Paper towels
Microfiber cloth
Dish soap
Baking soda
Steps:
Unplug the appliance and ensure it’s cool.
Remove the oil pan or drip tray, wipe off excess oil with a paper towel, and wash it with warm soapy water.
(Tip: Some air fryer parts are dishwasher-safe — check your manual first.)
Wash the frying basket with warm soapy water. For stubborn residue, soak for 10–15 minutes before gently brushing with a soft brush.
Dry all parts thoroughly to prevent rust.
Use a damp cloth with mild soap to clean the inside chamber, then wipe again with clean water to remove soap traces.
For the heating element, if food particles are stuck, mix a paste of baking soda and water. Gently scrub with a soft brush, then wipe clean and dry completely.
✨ Extra Tip: Once a month, run the air fryer empty for 3–5 minutes at 180°C after cleaning. This helps remove any lingering moisture or odor.
Cleaning your air fryer after every use prevents grease from hardening and saves you hours later. Here’s a fast daily routine:
Unplug and cool down the fryer.
Wipe the exterior with a damp cloth.
Rinse the basket and tray with warm soapy water — or just soak them for 5 minutes.
Use a soft sponge to remove any food residue.
Dry completely before reassembling.
This quick habit keeps your fryer fresh, odor-free, and ready for the next meal!
Never use metal brushes or scouring pads — they can permanently damage the non-stick coating.
Avoid immersing the main unit (where the heating element is) in water.
Always use gentle detergents — strong chemicals can corrode the surface.
Store the air fryer in a cool, dry place, away from moisture or direct sunlight.
Regular cleaning not only maintains hygiene but also prevents smoke, odors, and uneven heating in future cooking sessions.
Cleaning an air fryer doesn’t have to be a tiring chore. By following these simple steps and keeping up with light daily maintenance, you’ll extend your air fryer’s life, keep your food tasting great, and avoid that dreaded burnt smell that comes from leftover grease.
With just a few minutes of care after each use, your air fryer will stay spotless — ready to deliver crispy fries, juicy chicken, and healthy meals for years to come!