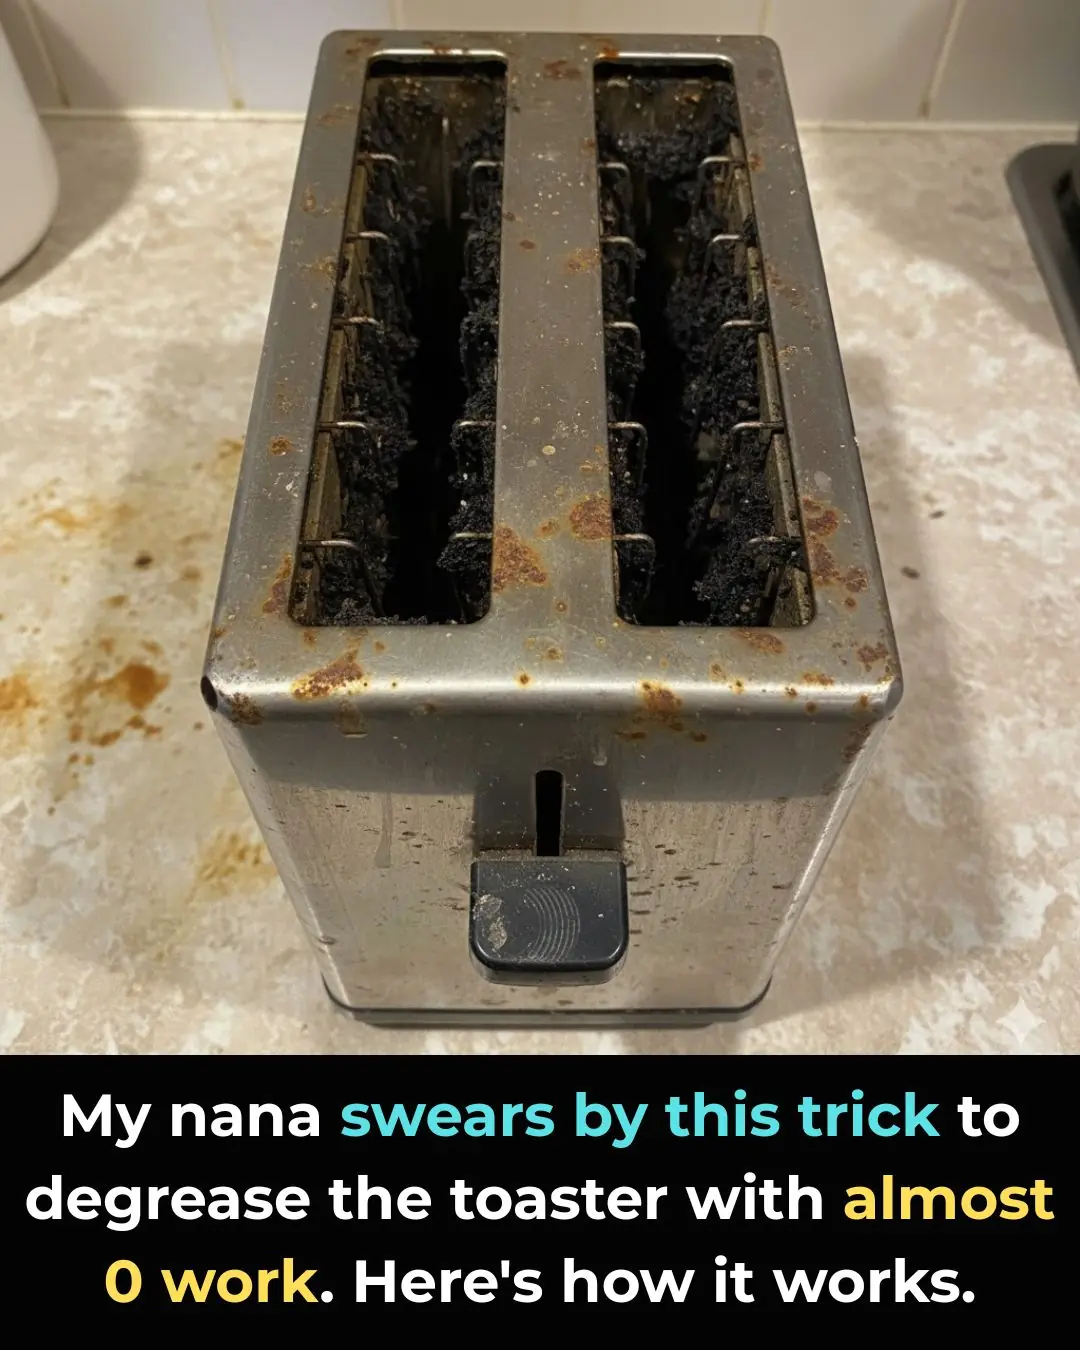
A toaster is one of those kitchen appliances we use almost every day—and one of the easiest to forget when it comes to cleaning. Over time, grease, fingerprints, and crumbs quietly build up, leaving it looking dull and unhygienic. Worse, excess grease and debris can even affect how well it works.
The good news? You don’t need harsh chemicals or expensive cleaners to bring your toaster back to life. My nana has relied on a simple, old-fashioned method for years, using just two common kitchen staples. It’s quick, safe, and surprisingly effective.
Let’s walk through this tried-and-true method step by step.
The Simple Cleaning Duo: Vinegar and Baking Soda
This classic combination works wonders in the kitchen—and your toaster is no exception.
-
White vinegar breaks down grease thanks to its natural acidity.
-
Baking soda gently lifts grime without scratching surfaces.
Together, they cut through buildup effortlessly while staying non-toxic and budget-friendly.
Step 1: Unplug and Empty the Toaster
Safety always comes first.
-
Unplug the toaster and allow it to cool completely.
-
Remove the crumb tray and any detachable parts.
-
Hold the toaster upside down over a bin or sink and gently shake out loose crumbs.
Nana’s advice: Be gentle—no aggressive shaking that could damage the heating elements.
Step 2: Remove Grease from the Exterior
In a small bowl, mix equal parts white vinegar and warm water.
-
Dip a soft cloth or sponge into the mixture and wring it out well.
-
Wipe down the toaster’s exterior, focusing on greasy or sticky areas.
-
For stubborn spots, sprinkle a little baking soda on the cloth and rub lightly.
This method lifts grease without damaging the finish. Avoid moisture near electrical openings or inside the toaster.
Step 3: Clean Tight Spaces and Removable Parts
Grease loves to hide in corners, knobs, and seams.
-
Use an old toothbrush or cotton swab dipped in the vinegar solution to clean small crevices.
-
Soak the crumb tray in warm water with a splash of vinegar for 10–15 minutes.
-
After soaking, scrub gently with baking soda, rinse, and set aside to dry.
Step 4: Wipe and Polish
Once all the grime is gone:
-
Wipe the toaster with a clean, damp cloth to remove any residue.
-
Dry and buff with a microfiber cloth for a streak-free shine.
Extra shine tip: For stainless steel toasters, add a tiny drop of olive oil or baby oil to your cloth and wipe in the direction of the grain. This helps repel fingerprints and restores a polished look.
Step 5: Dry Completely Before Reassembling
Let all parts air dry fully before putting the toaster back together.
-
Allow at least 30 minutes of drying time.
-
Never plug the toaster in while any moisture remains.
Once dry, reassemble—and it’s ready to use again.
Why This Method Works So Well
Vinegar dissolves grease naturally, while baking soda loosens stubborn residue without scratching surfaces. Their gentle reaction helps lift grime from areas that are hard to scrub by hand. Best of all, this method avoids the harsh chemicals often found in commercial degreasers.
Extra Benefits You’ll Love
-
Food-safe and non-toxic – Perfect for kitchen appliances
-
Eco-friendly – No chemical waste or strong fumes
-
Budget-friendly – Uses items already in your pantry
-
Low effort – Minimal scrubbing required
A Fresh, Like-New Toaster—The Easy Way
With this simple vinegar and baking soda trick, cleaning your toaster no longer feels like a chore. In just a few easy steps, it can look clean, shiny, and almost brand new again.
So next time grease and crumbs take over your toaster, remember Nana’s method. Sometimes, the simplest solutions really are the best.